After being connected to the power supply, the devices set up the METZ_CONNECT WiFi network. After logging into this network, all available access points are found and displayed.
The authorization to call up the device location is only required and used to display the currently connected access point. There is no actual location query.
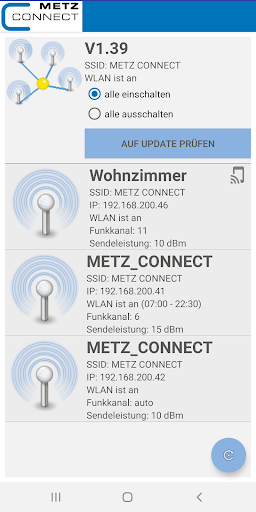
Overview screen:
The overview screen with the display of all APs in the network shows the following in the upper part:
• Software version: e.g. B. V1.39
• Button to check for software updates. It is checked whether the current firmware version is available on all devices.
• Ability to deactivate the WLAN on all APs except the one you are currently connected to. This ensures that the devices can still be accessed via the app.
For each AP, the following information is displayed on the overview screen in the delivery state
• Host name: METZ_CONNECT (the location of the AP should be entered here, e.g. living room).
• SSID: METZ_CONNECT (name of the WLAN network)
• IP: IP address of the AP assigned by the router (e.g. 192.168.1.25)
• WLAN is on / off
• Radio channel: e.g. B. 6
• Transmission power: e.g. 15 dBm
Detail and setting screen:
By selecting and tapping an AP you get to the details / settings screen. All standard settings of the AP can be changed here. A password is required for this, "admin" is preset.
The detail screen shows in the upper part
• Host name: METZ_CONNECT (.
• SSID: METZ_CONNECT (name of the WLAN network)
• IPv4: IP address of the AP assigned by the router (e.g. 192.168.1.25)
• MAC address: device-specific, unique, assigned by the manufacturer
The "BACK" button takes you back to the overview screen.
With the "APPLY" button, all the settings made in the lower part are adopted and saved in the AP.
• WLAN: Activate / deactivate
• Radio channel: adjustable between 1 and 13
• Transmission power: adjustable between 0 and 20dBm (1 and 100mW)
• Host name: location (e.g. living room)
• SSID: desired name of the WLAN network, e. B. Router SSID
• WPA2 key: at least 8 characters!
Timer setting:
• On: Time of day when the WLAN function should be switched on automatically.
• Off: Time of day when the WLAN function should be switched off automatically.
Installation note:
When installing multiple devices, it makes sense to configure them one after the other via the app:
1. Connect the AP to the PoE switch as described above.
2. Download the METZ CONNECT WLAN app from the Google Play Store or Apple Store.
3. Start the app the first available access point is displayed.
4. Selection of the detail screen (password "admin")
5. Make settings as described above.
It is particularly useful here to define the location of the AP as the host name. This means that the correct AP is always selected for future settings!
6. Repeat the process with the next AP
Note for further settings via the web interface:
For configuration in a professional environment, it may be necessary to adapt the network settings accordingly. The Openwrt web interface can be used for this, which can be called up in any web browser with the IP address shown in the app. It must be ensured that the PC or mobile device used for this is in the same IP number range. This is automatically the case if it is connected to the access point and thus the DHCP server (router) via WLAN or LAN.
A detailed description of the web interface can be found in the product description at www.metz-connect.com.