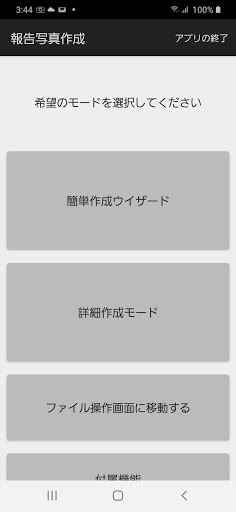
"Report attached photo style creation app" manual
This time, please use the "report attached photo style creation app".
thanks you.
In this app, in the form of a frame with 1 column and 3 rows,
You can create a photo style to be attached to the construction photo book.
Besides,
It may also be useful for creating something like a picture diary.
◆ How to use the Easy Creation Wizard:
★ 1. Only at the first startup
"Allow" "Access to photos, media and files in your device".
★ 2. After allowing, tap the "Restart app" button
Please restart the app.
★ The following screen will be displayed when starting up after the 3.2th time.
Please do "Easy Creation Wizard".
★ 4. First, when creating from now on
Please set the font and margins.
* The processing when importing images is
It is applied only from the operation after setting on this setting screen.
Therefore, even if you return and set with the "Back" button,
It does not apply to the operation before returning.
Next, if you want to add a cover.
Check "Add cover when outputting PDF"
Please enter the required information.
* Only when PDF is output by the following operations
You can attach the cover page set this time.
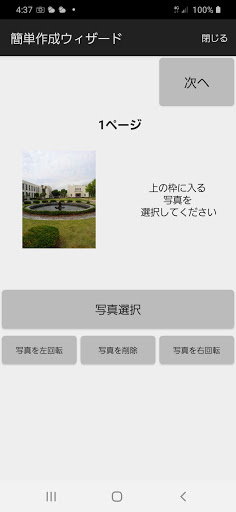
★ 5. Insert the photo you want to insert in the upper left of the style
After tapping the "Select Photo" button
Please select from the dialog.
* Photos that were in the same item so far will be overwritten.
* To recall the previous photo, tap the "Call current photo" button.
★ 6. After inserting the photo
Rotate the photo 90 degrees clockwise with the "Rotate photo right" button,
Rotate the photo 90 degrees counterclockwise with the "Rotate photo left" button,
If you want to leave the photo blank, click the "Delete Photo" button to delete it.
And when you're done editing
Tap the "Next" button.
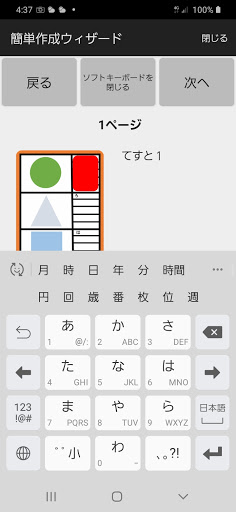
★ 7. Enter the text you want to write in the upper right corner of the form.
If the soft keyboard displayed at the time of writing is in the way
Tap the "Close Soft Keyboard" button
You can close the soft keyboard.
And when you're done editing
Tap the "Next" button.
★ 8. Central photo and text,
Do the same for the photos and texts at the bottom.
If it is blank, proceed to "Next".
You don't have to fill it all.
★ 9. Title / Subtitle,
Describe the title such as header / footer and stamp frame.
And when you're done editing
Tap the "Next" button.
★ 10. Since the editing of the first page is finished
If you want to output as it is
Tap any of the "PDF output", "XLSX output", and "ODS output" buttons.
If you want to continue creating the next page
Tap the "Next" button.
* Up to 5 pages can be edited.
* When outputting with "xlsx output" or "ods output"
Entered half-width ampersand, double quotes, "", pictograms, etc.
Some characters cannot be used during output.
At this time, the characters that cannot be used are
It will be replaced with full-width characters or half-width underscore symbols.
★ 11. File name when outputting
Specify the output range
Tap "OK".
★ 12. Creation process begins
After waiting for a while, the created file will be created.
* "Xlsx output" and "ods output" do not completely reproduce PDF output.
Also, the display of the created file is
The software that opens will cause a gap. In some cases, it may not be possible to open it with software.
* You can switch to the file operation screen by pressing "To operation screen" at the bottom of the "Detailed creation mode" screen.
In the list on the file operation screen
After tapping and selecting the file you want to handle,
You can perform each operation by pressing the "Open", "Share", and "Delete" buttons.
* The created file is created in the TageSP folder in the DCIM of the main unit.
★ 13. From the "Edit" button in the detailed creation mode, change the "App settings" and
"Copy from another page",
You can "backup" and "delete" items.
☆ 13-1. "App setting screen"
You can also enter from the "Go to app setting screen" button at the bottom of the screen.
◎ Font → You can select the style of the characters to be entered.
* In this app, the Information-technology Promotion Agency (IPA)
It includes and uses the distributed IPA font.
Therefore, when using this app,
You need to agree to "IPA Font License v1.0" at the URL below.
◆ "IPA Font License v1.0"
https://ipafont.ipa.go.jp/ipa_font_license_v1.html
* Some items may not be applied depending on the output format.
Also, the settings applied by the format are not uniform.
★ 14. From the "..." button at the top right of the action bar
Help, view privacy policy,
You can use the attached functions and terminate the application.
☆ 14-1. Help
Version information of this app and
You can see the explanation of the simple handling method.
You can switch the help content from the switch button on the upper right.
☆ 14-2. Detailed instructions
Open the web page that explains how to use this app.
* URL of the instruction manual
http://oyk3865b.blog13.fc2.com/blog-entry-3015.html
* Please also use the comment section of this article as a contact point for reports and opinions to the author.
☆ 14-3. Privacy policy
Open the web page of the privacy policy of this app.
* Privacy policy URL
http://oyk3865b.blog13.fc2.com/blog-entry-2990.html
* The instruction manual and privacy policy of this app are written in the blog article,
I'm just renting it as a place to post
You don't have to read other unrelated blog posts and have no intention of guiding you.
★ 15. Precautions
The author is not responsible for any damage caused by this app.
Please note before use.
File corruption due to this software cannot be guaranteed, so
Please note before use.
This app and the included functions
We have not investigated the specific environment in which it works or does not work.
Depending on the environment, the application cannot be installed,
The function stops. It may not be available. Please note before use.
Also, if you are dealing with "large size" images or a large number of images,
Due to lack of memory and machine power
The app may freeze. Please be careful before use.
The author has no responsibility whatsoever if something goes wrong.
still,
If you have any requests or opinions regarding this software,
Contacts on GoolePlay or
We would appreciate it if you could contact us in the comments section of the blog post in this manual.
However,
The author of this software, TageSP, is not obligated to support bugs.
Also,
We cannot respond to requests or opinions that exceed the ability of the author.
Please forgive me in advance.